Saving Sensor Data in CSV format

PSLab Android app by FOSSASIA provides a variety of features to its users. One of them is accessing various types of sensors both built into mobile phone and external sensors connected with PSLab device. In earlier versions users were only able to view the captured data. Moving forward, adding improvements to the app, now there is a feature to save those data displayed in graphs in csv format.

This feature is important in many ways. One is educational. In a classroom, teachers can ask students to perform an experiment and prepare a report using the data collected. By just visualizing they cannot do this. Actual data points must be made available. Another use is sharing data sets related to say environmental data over different demographics.

CSV, or comma-separated values file is a text file where stored data are separated by commas. The file stores these tabular data (numbers and text) in plain text format. Each line of the file represents a data record. Each data record consists of one or more fields, separated by commas. CSV files are commonly used to store sensor data because of its easy use. This post is about how PSLab device uses CSV file to write sensor data in it.

In PSLab android source code, there is a dedicated class to handle read sensor data from different instruments called “CSVLogger”. Developers can easily instantiate this class wherever they want a data logging as follows;

CSVLogger logger = new CSVLogger(<SUBFOLDER>); 
logger .writeCSVFile("Heading1,Heading2,Heading3\n");

 
This will create a blank folder in “PSLab” folder in device storage.  The CSV file is generated with the following convention according to the date and time where data is saved in the file.

yyyymmdd-hhmmss.csv

A sample file would have a name like 20180710-07:30:28.csv inside the SUBFOLDER which is specific to each instrument. Folder name will be the one used when initiating the CSVLogger.

With this method, logging data is pretty easy. Simply create a string which is a comma seperated and ended with a new line character. Then simply call the writeCSVFile(data) method with the string as a parameter added to it. It will keep appending string data until a new file is created. File creation can be handled by developers at their own interests and preferences.

String data = String.valueOf(System.currentTimeMillis()) + "," + item.getX() + "," + item.getY() + "\n";
logger.writeCSVFile(data);


To bring out an example let’s view how it’s implemented in Lux Meter instrument. This is a good source one can refer to when adding this feature in fragments

inside a main activity. In Lux Meter, there is the parent activity named Lux Meter and inside that there are two fragments, one is fragmentdata and the other one is fragmentsettings. Data capturing and saving occurs inside fragmentdata.

Menu icon controlling happens in the parent activity and we have bound a variable across the main activity and child fragment as follows;

LuxMeterActivity parent = (LuxMeterActivity) getActivity();
if (parent.saveData) {/* Save Data */}

 
This makes it easier listening menu icon clicks and start/stop recording accordingly. How to handle menu icons is beyond the scope of this blog and you can find tutorials on how to do that in the Resources section at the bottom of this blog post.

Once these CSV files are available, users can easily integrate them with advanced software like Matlab or Octave to do further analysis and processing to captured data sets.

Resources:

  1. CSV Logger: https://github.com/fossasia/pslab-android/blob/development/app/src/main/java/org/fossasia/pslab/others/CSVLogger.java
  2. Android Menu options: https://stackoverflow.com/questions/27984041/android-correct-use-of-invalidateoptionsmenu

Continue ReadingSaving Sensor Data in CSV format

Building PSLab Android app with Fdroid

Fdroid is a place for open source enthusiasts and developers to host their Free and Open Source Software (FOSS) for free and get more people onboard into their community. Hosting an app in Fdroid is not a fairly easy process just like hosting one in Google Play. We need to perform a set of build checks prior to making a merge request (which is similar to pull request in GitHub) in the fdroid-data GitLab repository. PSLab Android app by FOSSASIA has undergone through all these checks and tests and now ready to be published.

Setting up the fdroid-server and fdroid-data repositories is one thing. Building our app using the tools provided by fdroid is another thing. It will involve quite a few steps to get started. Fdroid requires all the apps need to be built using:

$ fdroid build -v -l org.fossasia.pslab


This will output a set of logs which tell us what went wrong in the builds. The usual one in a first time app is obviously the build is not taking place at all. The reason is our metadata file needs to be changed to initiate a build.

Build:<versioncode>,<versionname>
    commit=<commit which has the build mentioned in versioncode>
    subdir=app
    gradle=yes


When a metadata file is initially created, this build is disabled by default and commit is set to “?”. We need to fill in those blanks. Once completed, it will look like the snippet above. There can be many blocks of “Build” can be added to the end of metadata file as we are advancing and upgrading through the app. As an example, the latest PSLab Android app has the following metadata “Build” block:

Build:1.1.5,7
    commit=0a50834ccf9264615d275a26feaf555db42eb4eb
    subdir=app
    gradle=yes


In case of an update, add another “Build” block and mention the version you want to appear on the Fdroid repository as follows:

Auto Update Mode:Version v%v
Update Check Mode:Tags
Current Version:1.1.5
Current Version Code:7


Once it is all filled, run the build command once again. If you have properly set the environment in your local PC, build will end successfully assuming there were no Java or any other language syntax errors.

It is worth to mention few other facts which are common to Android software projects. Usually the source code is packed in a folder named “app” inside the repository and this is the common scenario if Android Studio builds up the project from scratch. If this “app” folder is one level below the root, that is “android/app”, the build instructions shown above will throw an error as it cannot find the project files.

The reason behind this is we have mentioned “subdir=app” in the metadata file. Change this to “subdir=android/app” and run the build again. The idea is to direct the build to find where the project files are.

Apart from that, the commit can be represented by a tag instead of a long commit hash. As an example, if we had merge commits in PSLab labeled as “v.<versioncode>”, we can simply use “commit=v.1.1.5” instead of the hash code. It is just a matter of readability.

Happy Coding!

Reference:

  1. Metadata : https://f-droid.org/docs/Build_Metadata_Reference/#Build
  2. PSLab Android app Fdroid : https://gitlab.com/fdroid/fdroiddata/merge_requests/3271/diffs

Continue ReadingBuilding PSLab Android app with Fdroid

Publish an Open Source app on Fdroid

Fdroid is a famous software repository hosted with numerous free and open source Android apps. They have a main repository where they allow developers hosting free and ad free software after a thorough check up on the app. This blog will tell you how to get your project hosted in their repository using steps I followed to publish the PSLab Android app.

Before you get started, make sure you have the consent from your developer community to publish their app on Fdroid. Fdroid requires your app to use all kind of open resources to implement features. If there is any closed source libraries in your app and you still want to publish it on Fdroid, you may have to reimplement that feature by any other mean without using closed source resources. They will also not allow to have Google’s proprietary “play-services” in your app along with proprietary ad services. You can find the complete inclusion policy document from their official page.

When your app is fully ready, you can get started with the inclusion procedure. Unlike how we are publishing apps on Google Play, publishing an app on Fdroid is as simple as sending a pull request to their main repository. That’s exactly what we have to do. In simple terms all we have to do is:

  1. Fork the Fdroid main data repository
  2. Make changes to their files to include our app
  3. Do a pull request

First of all you need a GitLab account as the Fdroid repository is hosted in GitLab. Once you are ready with a GitLab account, fork and clone the f-droid-data repository. The next step is to install the fdroid-server. This can be simply done using apt:

$ sudo apt install fdroidserver

 
Once that is done, go into the directory where you cloned the repository and run the following command to check if the initiation is complete.

$ fdroid init

 
Then run the following command to read current meta data where it saves all the information related to existing apps on Fdroid;

$ fdroid readmeta

 
This will list out various details about the current meta files. Next step is to add our app details into this meta file. This can be done easily using following command or you can manually create folders and files. But the following is safer;

$ fdroid import --url https://github.com/fossasia/pslab-android --subdir app

 
Replace the link to repository from the –url tag in the above command. For instance the following will be the link for fossasia-phimpme android;

$ fdroid import --url https://github.com/fossasia/phimpme-android --subdir app

 
This will create a file named as “org.fossasia.pslab” in the metadata directory. Open up this text file and we have to fill in our details.

  1. Categories
  2. License
  3. Web Site
  4. Summary
  5. Description

Description needs to be terminated with a newline and a dot to avoid build failures.

Once the file is filled up, run the following command to make sure that the metadata file is complete.

$ fdroid readmeta

 
Then run the following command to clean up the file

$ fdroid rewritemeta org.fossasia.pslab

 
We can automatically add version details using the following command:

$ fdroid checkupdates org.fossasia.pslab

 
Now run the lint test to see if the app is building correctly.

$ fdroid lint org.fossasia.pslab

 
If there are any errors thrown, fix them to get to the next step where we actually build the app:

$ fdroid build -v -l org.fossasia.pslab

 
Now you are ready to make the pull request which will then get reviewed by developers in Fdroid community to get it merged into their main branch. Make a commit and then push to your fork. From there it is pretty straightforward to make a pull request to the main repository. Once that is done, they will test the app for any insecurities. If all of them are passed, the app will be available in Fdroid!

Reference:

  1. Quick Start: https://gitlab.com/fdroid/fdroiddata/blob/master/README.md#quickstart
  2. Making merge requests: https://gitlab.com/fdroid/fdroiddata/blob/master/CONTRIBUTING.md#merge-requests

Continue ReadingPublish an Open Source app on Fdroid

Implementing Clickable Images

PSLab Android application is a feature rich compact app to user interface the PSLab hardware device. Similarly the PSLab device itself is a compact device with a plenty of features to replace almost all the analytical instruments in a school science lab. When a first time user takes the device and connect it with the Android app, there are so many pins labeled with abbreviations. This creates lots of complications unless the user checks the pinout diagram separately.

As a workaround a UI is proposed to integrate a layout containing the PSLab PCB image where user can click on each pin to get a dialog box explaining him what that specific pin is and what it does. This implementation can be done it two ways;

  • Using an Image map
  • Using (x,y) coordinates

The first implementation is more practical and can be applied with any device with any dimension. The latter requires some transformation to capture the correct position when user has clicked on a pin. So the first method will be implemented.

The idea behind using an image map is to have two images with exact dimensions on top of each other. The topmost image will be the color map which we create ourselves using unique colors at unique heat points. This image will have the visibility setting invisible as the main idea is to let the  user see a meaningful image and capture the positions using a secondary in the back end.

To make things much clear, let’s have a look at a color map image I am suggesting here for a general case.

If we overlap the color map with the PSLab layout, we will be able to detect where user has clicked using Android onTouchEvent.

@Override
public boolean onTouchEvent(MotionEvent ev) {
   final int action = ev.getAction();
   final int evX = (int) ev.getX();
   final int evY = (int) ev.getY();
   switch (action) {
       case MotionEvent.ACTION_UP :
         int touchColor = getHotspotColor (R.id.backgroundMap, evX, evY);
         /* Display the relevant pin description dialog box here */
         break;
   }
   return true;
}

 
Color of the clicked position can be captured using the following code;

public int getHotspotColor (int hotspotId, int x, int y) {
   ImageView img = (ImageView) findViewById (hotspotId);
   img.setDrawingCacheEnabled(true);
   Bitmap hotspots = Bitmap.createBitmap(img.getDrawingCache());
   img.setDrawingCacheEnabled(false);
   return hotspots.getPixel(x, y);
}

 
If we go into details, from the onTouchEvent we capture the (x,y) coordinates related to user click. Then this location is looked up for a unique color by creating a temporary bitmap and then getting the pixel value at the captured coordinate.

There is an error in this method as the height parameter always have an offset. This offset is introduced by the status bar and the action bar of the application. If we use this method directly, there will be an exception thrown out saying image height is less than the height defined by y.

Solving this issue involves calculating status bar and actionbar heights separately and then subtract them from the y coordinate.

Actionbar and status bar heights can be calculated as follows;

Rect rectangle = new Rect();
Window window = getWindow();
window.getDecorView().getWindowVisibleDisplayFrame(rectangle);
int statusBarHeight = rectangle.top;
int contentViewTop = window.findViewById(Window.ID_ANDROID_CONTENT).getTop();
int titleBarHeight= contentViewTop - statusBarHeight;

 
Using them, we can modify the captured coordinates as follows;

int touchColor = getHotspotColor (R.id.imageArea, evX, evY - statusBarHeight);

 
This way the exception is handled by adjusting the cursor position. Once this is done, it is all about displaying the correct pin description dialog box.

Reference:

Calculate status bar height: https://stackoverflow.com/questions/3407256/height-of-status-bar-in-android

Continue ReadingImplementing Clickable Images

Automatic Signing and Publishing of Android Apps from Travis

As I discussed about preparing the apps in Play Store for automatic deployment and Google App Signing in previous blogs, in this blog, I’ll talk about how to use Travis Ci to automatically sign and publish the apps using fastlane, as well as how to upload sensitive information like signing keys and publishing JSON to the Open Source repository. This method will be used to publish the following Android Apps:

Current Project Structure

The example project I have used to set up the process has the following structure:

It’s a normal Android Project with some .travis.yml and some additional bash scripts in scripts folder. The update-apk.sh file is standard app build and repo push file found in FOSSASIA projects. The process used to develop it is documented in previous blogs. First, we’ll see how to upload our keys to the repo after encrypting them.

Encrypting keys using Travis

Travis provides a very nice documentation on encrypting files containing sensitive information, but a crucial information is buried below the page. As you’d normally want to upload two things to the repo – the app signing key, and API JSON file for release manager API of Google Play for Fastlane, you can’t do it separately by using standard file encryption command for travis as it will override the previous encrypted file’s secret. In order to do so, you need to create a tarball of all the files that need to be encrypted and encrypt that tar instead. Along with this, before you need to use the file, you’ll have to decrypt in in the travis build and also uncompress it for use.

So, first install Travis CLI tool and login using travis login (You should have right access to the repo and Travis CI in order to encrypt the files for it)

Then add the signing key and fastlane json in the scripts folder. Let’s assume the names of the files are key.jks and fastlane.json

Then, go to scripts folder and run this command to create a tar of these files:

tar cvf secrets.tar fastlane.json key.jks


secrets.tar will be created in the folder. Now, run this command to encrypt the file

travis encrypt-file secrets.tar


A new file secrets.tar.enc will be created in the folder. Now delete the original files and secrets tar so they do not get added to the repo by mistake. The output log will show the the command for decryption of the file to be added to the .travis.yml file.

Decrypting keys using Travis

But if we add it there, the keys will be decrypted for each commit on each branch. We want it to happen only for master branch as we only require publishing from that branch. So, we’ll create a bash script prep-key.sh for the task with following content

#!/bin/sh
set -e

export DEPLOY_BRANCH=${DEPLOY_BRANCH:-master}

if [ "$TRAVIS_PULL_REQUEST" != "false" -o "$TRAVIS_REPO_SLUG" != "iamareebjamal/android-test-fastlane" -o "$TRAVIS_BRANCH" != "$DEPLOY_BRANCH" ]; then
    echo "We decrypt key only for pushes to the master branch and not PRs. So, skip."
    exit 0
fi

openssl aes-256-cbc -K $encrypted_4dd7_key -iv $encrypted_4dd7_iv -in ./scripts/secrets.tar.enc -out ./scripts/secrets.tar -d
tar xvf ./scripts/secrets.tar -C scripts/


Of course, you’ll have to change the commands and arguments according to your need and repo. Specially, the decryption command keys ID

The script checks if the repo and branch are correct, and the commit is not of a PR, then decrypts the file and extracts them in appropriate directory

Before signing the app, you’ll need to store the keystore password, alias and key password in Travis Environment Variables. Once you have done that, you can proceed to signing the app. I’ll assume the variable names to be $STORE_PASS, $ALIAS and $KEY_PASS respectively

Signing App

Now, come to the part in upload-apk.sh script where you have the unsigned release app built. Let’s assume its name is app-release-unsigned.apk.Then run this command to sign it

cp app-release-unsigned.apk app-release-unaligned.apk
jarsigner -verbose -tsa http://timestamp.comodoca.com/rfc3161 -sigalg SHA1withRSA -digestalg SHA1 -keystore ../scripts/key.jks -storepass $STORE_PASS -keypass $KEY_PASS app-release-unaligned.apk $ALIAS


Then run this command to zipalign the app

${ANDROID_HOME}/build-tools/25.0.2/zipalign -v -p 4 app-release-unaligned.apk app-release.apk


Remember that the build tools version should be the same as the one specified in .travis.yml

This will create an apk named app-release.apk

Publishing App

This is the easiest step. First install fastlane using this command

gem install fastlane


Then run this command to publish the app to alpha channel on Play Store

fastlane supply --apk app-release.apk --track alpha --json_key ../scripts/fastlane.json --package_name com.iamareebjamal.fastlane


You can always configure the arguments according to your need. Also notice that you have to provide the package name for Fastlane to know which app to update. This can also be stored as an environment variable.

This is all for this blog, you can read more about travis CLI, fastlane features and signing process in these links below:

Continue ReadingAutomatic Signing and Publishing of Android Apps from Travis

Enabling Google App Signing for Android Project

Signing key management of Android Apps is a hectic procedure and can grow out of hand rather quickly for large organizations with several independent projects. We, at FOSSASIA also had to face similar difficulties in management of individual keys by project maintainers and wanted to gather all these Android Projects under singular key management platform:

To handle the complexities and security aspect of the process, this year Google announced App Signing optional program where Google takes your existing key’s encrypted file and stores it on their servers and asks you to create a new upload key which will be used to sign further updates of the app. It takes the certificates of your new upload key and maps it to the managed private key. Now, whenever there is a new upload of the app, it’s signing certificate is matched with the upload key certificate and after verification, the app is signed by the original private key on the server itself and delivered to the user. The advantage comes where you lose your key, its password or it is compromised. Before App Signing program, if your key got lost, you had to launch your app under a new package name, losing your existing user base. With Google managing your key, if you lose your upload key, then the account owner can request Google to reassign a new upload key as the private key is secure on their servers.

There is no difference in the delivered app from the previous one as it is still finally signed by the original private key as it was before, except that Google also optimizes the app by splitting it into multiple APKs according to hardware, demographic and other factors, resulting in a much smaller app! This blog will take you through the steps in how to enable the program for existing and new apps. A bit of a warning though, for security reasons, opting in the program is permanent and once you do it, it is not possible to back out, so think it through before committing.

For existing apps:

First you need to go to the particular app’s detail section and then into Release Management > App Releases. There you would see the Get Started button for App Signing.

The account owner must first agree to its terms and conditions and once it’s done, a page like this will be presented with information about app signing infrastructure at top.

So, as per the instructions, download the PEPK jar file to encrypt your private key. For this process, you need to have your existing private key and its alias and password. It is fine if you don’t know the key password but store password is needed to generate the encrypted file. Then execute this command in the terminal as written in Step 2 of your Play console:

java -jar pepk.jar –keystore={{keystore_path}} –alias={{alias}} –output={{encrypted_file_output_path}} –encryptionkey=eb10fe8f7c7c9df715022017b00c6471f8ba8170b13049a11e6c09ffe3056a104a3bbe4ac5a955f4ba4fe93fc8cef27558a3eb9d2a529a2092761fb833b656cd48b9de6a

You will have to change the bold text inside curly braces to the correct keystore path, alias and the output file path you want respectively.

Note: The encryption key has been same for me for 3 different Play Store accounts, but might be different for you. So please confirm in Play console first

When you execute the command, it will ask you for the keystore password, and once you enter it, the encrypted file will be generated on the path you specified. You can upload it using the button on console.

After this, you’ll need to generate a new upload key. You can do this using several methods listed here, but for demonstration we’ll be using command line to do so:

keytool -genkey -v -keystore {{keystore_path}} -alias {{alias_name}} -keyalg RSA -keysize 2048 -validity 10000

The command will ask you a couple of questions related to the passwords and signing information and then the key will be generated. This will be your public key and be used for further signing of your apps. So keep it and the password secure and handy (even if it is expendable now).

After this step, you need to create a PEM upload certificate for this key, and in order to do so, execute this command:

keytool -export -rfc -keystore {{keystore_path}} -alias {{alias_name}} -file {{upload_certificate.pem}}

After this is executed, it’ll ask you the keystore password, and once you enter it, the PEM file will be generated and you will have to upload it to the Play console.

If everything goes right, your Play console will look something like this:


Click enrol and you’re done! Now you can go to App Signing section of the Release Management console and see your app signing and new upload key certificates


You can use the SHA1 hash to confirm the keys as to which one corresponds to private and upload if ever in confusion.

For new apps:

For new apps, the process is like a walk in park. You just need to enable the App Signing, and you’ll get an option to continue, opt-out or re-use existing key.


If you re-use existing key, the process is finished then and there and an existing key is deployed as the upload key for this app. But if you choose to Continue, then App Signing will be enabled and Google will use an arbitrary key as private key for the app and the first app you upload will get its key registered as the upload key


This is the screenshot of the App Signing console when there is no first app uploaded and you can see that it still has an app signing certificate of a key which you did not upload or have access to.

If you want to know more about app signing program, check out these links:

Continue ReadingEnabling Google App Signing for Android Project

How Switch Case improve performance in PSLab Saved Experiments

PSLab android application contains nearly 70 experiments one can experiment on using the PSLab device and the other necessary circuit components and devices. These experiments span over areas such as Electronics, Electrical, Physical and High school level. All these experiments are accessible via an android adapter in the repository named “PerformExperimentAdapter”. This adapter houses a tab view with two different tabs; one for the experiment details and the other for actual experiment and resultant graphs.

The adapter extends an inbuilt class FragmentPagerAdapter;

public class PerformExperimentAdapter extends FragmentPagerAdapter

This class displays every page attached to its viewpager as a fragment. The good thing about using fragments is that they have a recyclable life cycle. Rather than creating new views for every instance of an experiment, the similar views can be recycled to use once again saving resources and improving performance. FragmentPagerAdapter needs to override a method to display the correct view on the tab select by user.

@Override
public Fragment getItem(int position) {

}

Depending on the value of position, relevant experiment documentation and the experiment implementation fragments are displayed determined using the experiment title. Performance can be critical in this place as if it takes too long to process and render a fragment, user will feel a lag.

The previous implementation was using consecutive if statements.

@Override
public Fragment getItem(int position) {
   switch (position) {
       case 0:
           if (experimentTitle.equals(context.getString(R.string.diode_iv)))
               return ExperimentDocFragment.newInstance("D_diodeIV.html");
           if (experimentTitle.equals(context.getString(R.string.zener_iv)))
               return ExperimentDocFragment.newInstance("D_ZenerIV.html");
           ...
       case 1:
           if (experimentTitle.equals(context.getString(R.string.diode_iv)))
               return ZenerSetupFragment.newInstance();
           if (experimentTitle.equals(context.getString(R.string.zener_iv)))
               return DiodeExperiment.newInstance(context.getString(R.string.half_wave_rectifier));
           ...
       default:
           return ExperimentDocFragment.newInstance("astable-multivibrator.html");
   }
}

This setup was suitable for applications where there is less than around 5 choices to chose between. As the list grows, the elements in the end of the if layers will take more time to load as each of the previous if statements need to be evaluated false in order to reach the bottom statements.

This is when this implementation was replaced using switch case statements instead of consecutive if statements. The theory behind the performance improvement involves algorithm structures; Hash Tables

Hash Tables

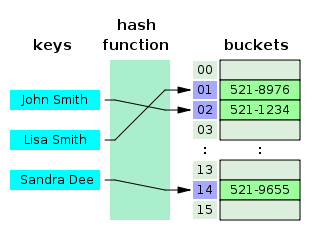
Hash tables use a hash function to calculate the index of the destination cell. This operation on average has a complexity of O(1) which means it will take the same time to access any two elements which are randomly positioned.

This is possible because java uses the hash code of the string to determine the index where the target is situated at. This way it is much faster than consecutive if statement calls where in the worst case it will take O(n) time to reach the statement causing a lag in the application.

Current application uses switch cases in the PerformExperimentAdapter;

@Override
public Fragment getItem(int position) {
   switch (position) {
       case 0:
           switch (experimentTitle) {
               case "Diode IV Characteristics":
                   return ExperimentDocFragment.newInstance("D_diodeIV.html");
               case "Zener IV Characteristics":
                   return ExperimentDocFragment.newInstance("D_ZenerIV.html");
               case "Half Wave Rectifier":
                   return ExperimentDocFragment.newInstance("L_halfWave.html");
           }
       case 1:
           switch (experimentTitle) {
               case "Diode IV Characteristics":
                   return ZenerSetupFragment.newInstance();
               case "Zener IV Characteristics":
                   return ZenerSetupFragment.newInstance();
               case "Half Wave Rectifier":
                   return DiodeExperiment.newInstance(context.getString(R.string.half_wave_rectifier));
           }
       default:
           return ExperimentDocFragment.newInstance("astable-multivibrator.html");
   }
}

There is one downfall in using switch case in the context. That is the inability to use string resources directly as Java requires a constant literals in the evaluation statement of a case.

Resources:

Continue ReadingHow Switch Case improve performance in PSLab Saved Experiments

Coloring Waveforms in PSLab Charts

Charts are used to display set of data in an analytical manner such that an observer can easily come to a conclusion by just looking at it without having to go through all the numerical data sets. Legends are used to differentiate a set of data set from another set. Generally, different colors and different names are used to form a legend in a chart.

MPAndroidChart is an amazing library with the capability of generating different types of graphs in an Android device. In PSLab several user interfaces are implemented using LineCharts to display different waveforms such as readings from channels attached to PSLab device, logic levels etc.

When several data sets are being plotted on the same graph area, legends are used. In PSLab Android application, Oscilloscope supports four different type of waveforms to be plotted on the same graph. Logic Analyzer implements one to four different types of logic level waveforms on the same plot. To identify which is which, legends with different colors can be used rather than just the names. For the legends to have different colors, it should be explicitly set which color should be held by which data set. Otherwise it will use the default color to all the legends making it hard to differentiate data lines when there are more than one data set is plotted.

Assume a data set is generated from a reading taken from a probe attached to PSLab device. The set will be added as an Entry to an array list as follows;

ArrayList<Entry> dataSet = new ArrayList<Entry>();

The next step will be to create a Line Data Set

LineDataSet lineData = new LineDataSet(dataSet, "DataSet 1");

This LineDataSet will contain sample values of the waveform captured by the microprocessor. A LineDataSet object support many methods to alter its look and feel. In order to set a color for the legend, setColor() method will be useful. This method accepts an integer as the color. This method can be accessed as follows;

lineData.setColor(Color.YELLOW);

MPAndroidChart provides different sets of colors under ColorTemplate. This class has several predefined colors with five colors in each color palette are added by the developers of the library and they can be accessed using the following line of code by simply calling the index value of the palette array list.

set1.setColor(ColorTemplate.JOYFUL_COLORS[0]);

Set of color palettes available in the ColorTemplate class are;

  1. LIBERTY_COLORS
  2. JOYFUL_COLORS
  3. PASTEL_COLORS
  4. COLORFUL_COLORS
  5. VORDIPLOM_COLORS
  6. MATERIAL_COLORS

The following demonstrates how the above activities produce a line chart with three different data sets with different colored legends.

This implementation can be used to enhance the readability of the waveforms letting user being able to differentiate between one waveform from another in PSLab Android application.

Resources:

PSLab official web site: https://pslab.fossasia.org/

Continue ReadingColoring Waveforms in PSLab Charts

Preparing for Automatic Publishing of Android Apps in Play Store

I spent this week searching through libraries and services which provide a way to publish built apks directly through API so that the repositories for Android apps can trigger publishing automatically after each push on master branch. The projects to be auto-deployed are:

I had eyes on fastlane for a couple of months and it came out to be the best solution for the task. The tool not only allows publishing of APK files, but also Play Store listings, screenshots, and changelogs. And that is only a subset of its capabilities bundled in a subservice supply.

There is a process before getting started to use this service, which I will go through step by step in this blog. The process is also outlined in the README of the supply project.

Enabling API Access

The first step in the process is to enable API access in your Play Store Developer account if you haven’t done so. For that, you have to open the Play Dev Console and go to Settings > Developer Account > API access.

If this is the first time you are opening it, you’ll be presented with a confirmation dialog detailing about the ramifications of the action and if you agree to do so. Read carefully about the terms and click accept if you agree with them. Once you do, you’ll be presented with a setting panel like this:

Creating Service Account

As you can see there is no registered service account here and we need to create one. So, click on CREATE SERVICE ACCOUNT button and this dialog will pop up giving you the instructions on how to do so:

So, open the highlighted link in the new tab and Google API Console will open up, which will look something like this:

Click on Create Service Account and fill in these details:

Account Name: Any name you want

Role: Project > Service Account Actor

And then, select Furnish a new private key and select JSON. Click CREATE.

A new JSON key will be created and downloaded on your device. Keep this secret as anyone with access to it can at least change play store listings of your apps if not upload new apps in place of existing ones (as they are protected by signing keys).

Granting Access

Now return to the Play Console tab (we were there in Figure 2 at the start of Creating Service Account), and click done as you have created the Service Account now. And you should see the created service account listed like this:

Now click on grant access, choose Release Manager from Role dropdown, and select these PERMISSIONS:

Of course you don’t want the fastlane API to access financial data or manage orders. Other than that it is up to you on what to allow or disallow. Same choice with expiry date as we have left it to never expire. Click on ADD USER and you’ll see the Release Manager created in the user list like below:

Now you are ready to use the fastlane service, or any other release management service for that matter.

Using fastlane

Install fastlane by

sudo gem install fastlane

Go to your project folder and run

fastlane supply init

First it will ask the location of the private key JSON file you downloaded, and then the package name of the application you are trying to initialize fastlane for.

Then it will create metadata folder with listing information excluding the images. So you’ll have to download and place the images manually for the first time

After modifying the listing, images or APK, run the command:

fastlane supply run

That’s it. Your app along with the store listing has been updated!

This is a very brief introduction to the capabilities of the supply service. All interactive options can be supplied via command line arguments, certain parts of the metadata can be omitted and alpha beta management along with release rollout can be done in steps! Make sure to check out the links below:

Continue ReadingPreparing for Automatic Publishing of Android Apps in Play Store

Basics behind school level experiments with PSLab

Electronics is a fascinating subject to most kids. Turning on a LED bulb, making a simple circuit will make them dive into much more interesting areas in the field of electronics. PSLab android application with the help of PSLab device implements a set of experiments whose target audience is school children. To make them more interested in science and electronics, there are several experiments implemented such as measuring body resistance, lemon cell experiment etc.

This blog post brings out the basics in implementing these type of experiments and pre-requisite.

Lemon Cell Experiment

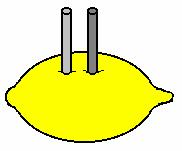
Lemon Cell experiment is a basic experiment which will make school kids interested in science experiments. The setup requires a fresh lemon and a pair of nails which is used to drive into the lemon as illustrated in the figure. The implementation in PSLab android application uses it’s Channel 1. The cell generates a low voltage which can be detected using the CH1 pin of PSLab device and it is sampled at a rate of 10 to read an accurate result.

float voltage = (float) scienceLab.getVoltage("CH1", 10);

2000 instances are recorded using this method and plotted against each instance. The output graph will show a decaying graph of voltage measured between the nails driven into the lemon.

for (int i = 0; i < timeAxis.size(); i++) {
   temp.add(new Entry(timeAxis.get(i), voltageAxis.get(i)));
}

Human Body Resistance Measurement Experiment

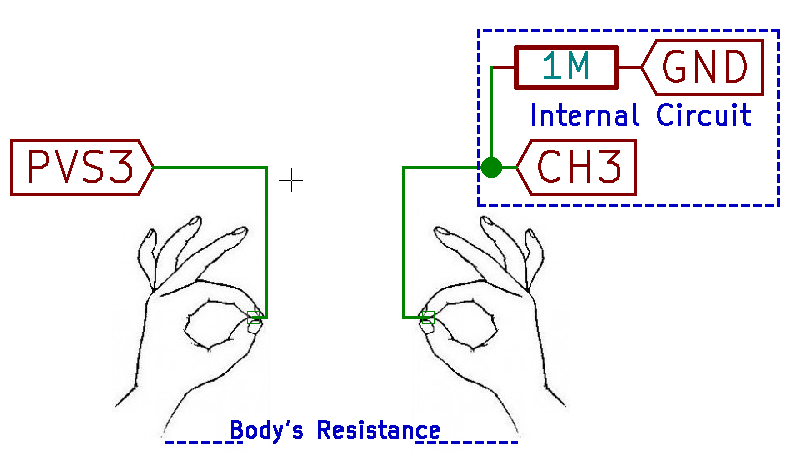
This experiment attracts most of the young people to do electronic experiments. This is implemented in the PSLab android application using Channel 3 and the Programmable Voltage Source 3 which can generate voltage up to 3.3V. The experiment requires a human with drippy palms so it makes a good conductance between device connection and the body itself.

The PSLab device has an internal resistance of 1M Ohms connected with the Channel 3 pin. Experiment requires a student to hold two wires with the metal core exposed; in both hands. One wire is connected to PV3 pin when the other wire is connected to CH3 pin. When a low voltage is supplied from the PV3 pin, due to heavy resistance in body and the PSLab device, a small current in the range of nano amperes will flow through body. Using the reading from CH3 pin and the following calculation, body resistance can be measured.

voltage = (float) scienceLab.getVoltage("CH3", 100);
current = voltage / M;
resistance = (M * (PV3Voltage - voltage)) / voltage;

This operation is executed inside a while loop to provide user with a continuous set of readings. Using Java threads there is a workaround to implement the functionalities inside the while loop without overwhelming the system. First step is to create a object without any attribute.

private final Object lock = new Object();

Java threads use synchronized methods where other threads won’t start until the first thread is completed or paused operation. We make use of that technique to provide enough time to read CH3 pin and display output.

while (true) {
   new MeasureResistance().execute();
   synchronized (lock) {
       try {
           lock.wait();
       } catch (InterruptedException e) {
           e.printStackTrace();
       }
   }
}

Once the pin readings and value updates are complete the lock is released to execute the method once again.

updateDataBox();
synchronized (lock) {
   lock.notify();
}

Capacitor Discharge Experiment

This experiment is somewhat similar to the Lemon Cell Experiment as this experiments on electron storage and discharge. The experiment is carried out using two bulky electrolyte capacitors. PSLab device is capable of generating PWM waveforms with any duty cycle. Refer to this article to learn more about how PWM waves are generated using PSLab device to implement more features like sine wave generation.

Using the SQR1 pin of the PSLab device, one capacitor is charged to its fullest capacity using a PWM wave with 100% duty cycle at a 100 Hz.

scienceLab.setSqr1(100, 100, false);

This capacitor is then connected in parallel with the other capacitor which is empty. The voltage transfer is measured using CH1 pin at a sampling rate of 10

float voltage = (float) scienceLab.getVoltage("CH1", 10);

To provide a continuous update in the voltage transfer, a similar implementation is used using an object in the thread to control the implementation inside a while loop.

Resources:

Continue ReadingBasics behind school level experiments with PSLab