Using RealmRecyclerView Adapter to show list of recorded sensor data from Realm Database

In previous blog Storing Recorded Sensor Data in Realm Database we have stored the data fetched from sensors into the Realm Database by defining model classes.

In this blog, we will use the data stored in the Realm to display a list of recorded experiments in the form of well defining card view items so that it is easier for the user to understand.

For showing the list we will make use of RecyclerView  widget provided by Android which is a more advanced version of the List view and is used to display large data sets in a vertical list, horizontal list, grid, staggered grid etc.

RecyclerView  works in accordance with RecyclerView Adapter which is core engine that is responsible of inflating the layout of list items, populating the items with data, recycling of list item views when they go out of viewing screen and much more.

For this blog, we are going to use a special RecyclerView Adapter provided by Realm itself because it integrates properly with the Realm Database and handles modifying, addition, deletion or updating of Realm data automatically and efficiently.   

Step 1 Adding the dependencies

As always first we need to add the following code in our build.gradle file to add the dependency of Realm database and RealmRecyclerViewAdapter.

dependencies {
   implementation"com.android.support:recyclerview-v7:27.1.1 "
   implementation 'io.realm:android-adapters:2.1.1'
}

Step 2 Adding RecyclerView widget in our Activity layout file

First, we need to create an activity and name it as “DataLoggerActivity”, inside the layout of the Activity add the <RecyclerView> widget. This RecyclerView will act as a container of our list item.

<?xml version="1.0" encoding="utf-8"?>
<RelativeLayout xmlns:android="http://schemas.android.com/apk/res/android"
    xmlns:tools="http://schemas.android.com/tools"
    android:layout_width="match_parent"
    android:layout_height="match_parent"
    xmlns:app="http://schemas.android.com/apk/res-auto"
    tools:context=".activity.DataLoggerActivity">

    <android.support.v7.widget.RecyclerView
        android:layout_below="@id/top_app_bar_layout"
        android:id="@+id/recycler_view"
        android:layout_width="match_parent"
        android:layout_height="wrap_content" />
</RelativeLayout>

Step 3 Creating the layout and View holder for the list item

We have to create the layout of the list item which will be inflated by the Adapter. So for this create an XML file in res folder and name it “data_list_item.xml”. For the list of the experiments, we want to show Name of the experiment, recording time, recording date for every list item. For this we will make use of <CardView> and <TextView>. This gist shows the code of xml file.

The layout of the list item created is shown in Figure 2

Figure 1 Layout of list item showing mock information

Now we need to create a view holder for this layout which we need to pass to the Adapter, the following code shows the implementation of View Holder for above list item layout.

public class ViewHolder extends RecyclerView.ViewHolder {
   private TextView sensor, dateTime;
   ImageView deleteIcon;
   private CardView cardView;

   public ViewHolder(View itemView) {
       super(itemView);
       dateTime = itemView.findViewById(R.id.date_time);
       sensor = itemView.findViewById(R.id.sensor_name);
       deleteIcon = itemView.findViewById(R.id.delete_item);
       cardView = itemView.findViewById(R.id.data_item_card);
   }
}

Step 4 Creating the adapter for RecyclerView  

In this step, we will start by creating a class called “SensorLoggedListAdpater” and for using use the RecyclerView adapter provided by Realm we need to make this class extend the RealmRecyclerViewAdpater class.

But for that we need to pass two generic parameter:

  1. Model Class : This is class which define a Realm model, for this, we will pass a reference of “SensorLogged.class” which is defined in the previous blog as we want to show the list experiments which are stored using “SensorLogged” model class.
  2. ViewHolder : For this, we will pass the ViewHolder that we have created in Step 3.

As every RecyclerView Adapter needs a arraylist which contains the list of object containing information which we have to populate on the list item, the RealmRecyclerViewAdpater needs data in form of RealmResult to operate on, so we will create a constructor and pass in the RealmResult list in the super() method which we need to provide when we initialize this adapter in our “DataLoggerActivity” class.

public SensorLoggerListAdapter(RealmResults<SensorLogged> list, Activity context) {
   super(list, true, true);
   this.context = context;
   realm = Realm.getDefaultInstance();
}

Now we need to override two methods provided by RealmRecyclerViewAdapter class that are:

  1. public ViewHolder onCreateViewHolder(@NonNull ViewGroup parent, int viewType): In which we will inflate the layout of list item “dta_list_tem.xml” which we have created in Step 3.
  2. public void onBindViewHolder(@NonNull final ViewHolder holder, int position): In which we will populate the list item view using references stored in the ViewHolder with the data which we have provided while initializing the adapter.
@NonNull
@Override
public ViewHolder onCreateViewHolder(@NonNull ViewGroup parent, int viewType) {
   View itemView = LayoutInflater.from(parent.getContext()).inflate(R.layout.logger_data_item, parent, false);
   return new ViewHolder(itemView);
}

@Override
public void onBindViewHolder(@NonNull final ViewHolder holder, int position) {
   SensorLogged temp = getItem(position);
   holder.sensor.setText(temp.getSensor());
   Date date = new Date(temp.getDateTimeStart());
   holder.dateTime.setText(String.valueOf(sdf.format(date)));
}

Step 5 Initializing the Adapter in Data Logger Activity and connecting with RecyclerView

Now we head to our Data Logger Activity, here in OnCreate() method first we will create a object of RecyclerView, then we will initialize our adapter by passing the RealmResult<SensorLogged> list which we have queried from the Realm Database.

Then we will set the LinearLayoutManager and finally, we will connect the the Adapter with the RecyclerView.

@Override
protected void onCreate(Bundle savedInstanceState) {
   super.onCreate(savedInstanceState);
   setContentView(R.layout.activity_data_logger);
   ButterKnife.bind(this);

   Realm realm = Realm.getDefaultInstance();

   RealmResults<SensorLogged> results;
   String title;
  
   results = realm.where(SensorLogged.class)
           .findAll()
           .sort("dateTimeStart", Sort.DESCENDING);

   SensorLoggerListAdapter adapter = new SensorLoggerListAdapter(results, this);
   LinearLayoutManager linearLayoutManager = new LinearLayoutManager(this, LinearLayoutManager.VERTICAL, false);

   recyclerView.setLayoutManager(linearLayoutManager);

   recyclerView.setAdapter(adapter);
}

After following all the above steps we have finally a activity as shown in Figure 4.

Figure 2 showing a list of recorded experiments with the instrument
name and date time of an experiment

Thus we have successfully displayed a list of the experiments from the data stored in the Realm Database using RealmRecyclerViewAdapter.

Resources

  1. https://academy.realm.io/posts/android-realm-listview/ – Blog on creating a To-do list on Realm official website
  2. https://gist.github.com/Avjeet/2f350feeafff17ec855a39891d8c2d66  Gist of layout of list item used
Continue ReadingUsing RealmRecyclerView Adapter to show list of recorded sensor data from Realm Database

Storing Recorded Sensor Data in Realm Database

PSLab android app provides various new features like accessing data from the sensors that are either inbuilt into the Android phone or common I2C sensors which are connected to the PSLab device through PIC microcontroller. But the problem is that if the user records the data one time he/she may not be able to view that data in the future as there was no way to save that data somewhere. Saved data can be used for school experiments, preparing reports, research purposes etc.

So, now we have integrated Realm database with the Sensor Data Logger module which is a mobile database that can be used to store real-time data in fast and flawless manner. It is a object oriented database so it stores data in the form of objects which makes it usage with object oriented programming language like Java much easier.

In this blog we will demonstrate the process of storing data from one instrument  i.e., Lux Meter which records illuminance with respect to time to understand the process.

First, we have defined a model class “SensorLogged” which contains information pertaining to all one experiment performed by the user. It will have fields like time of start of recording, the time of the end of the recording, date of recording, sensor name etc.

Whenever a user performs an experiment we will store a object of the SensorLogged model class in realm database containing info for that experiment.

public class SensorLogged extends RealmObject {

   private String sensor;
   private long dateTimeStart;
   @PrimaryKey
   private long uniqueRef;
   private long dateTimeEnd;

   public SensorLogged(String sensor) {
       this.sensor = sensor;
   }

   public void setSensor(String sensor) {
       this.sensor = sensor;
   }
   public void setDateTimeStart(long dateTimeStart) {
       this.dateTimeStart = dateTimeStart;
   }
   public void setUniqueRef(long uniqueRef) {
       this.uniqueRef = uniqueRef;
   }
   public void setDateTimeEnd(long dateTimeEnd) {
       this.dateTimeEnd = dateTimeEnd;
   }
}


For storing Lux data we have to define a model class “LuxData” which defines all the fields in one reading of experiment.

public class LuxData extends RealmObject {
   private long foreignKey;
   private float lux;
   private long timeElapsed;
   public LuxData() {
   }
   public LuxData(float lux, long timeElapsed) {
       this.lux = lux;
       this.timeElapsed = timeElapsed;
   }
   public long getForeignKey() {
       return foreignKey;
   }
   public void setForeignKey(long foreignKey) {
       this.foreignKey = foreignKey;
   }
}

We will use the object of this class for every reading of one measurement and provide them with the same Foreign Key which will be Primary key uniqueRef of “SensorLogged” model class.

In this way, we can query all the reading belonging to one measurement from the database containing all the LuxData entries.

For storing the data in Realm database we will follow these steps:

  1. Begin the Realm transaction.

    realm.beginTransaction();
  2. Create a object of “SensorLogged” model class for every measurement with the unique Ref as the primary key and store the information like time of start, date of start, sensor name etc. copy it to the Realm Database.

    SensorLogged sensorLogged = realm.createObject(SensorLogged.class, uniqueRef);
    sensorLogged.setSensor("Lux Meter");
    sensorLogged.setDateTimeStart(startTime);
    realm.copyToRealm(sensorLogged);
  3. For every sensor, reading create a object of LuxData and store the reading in it with the time elapsed and set all the object to same Foreign Key which is same as the Primary key stored in “SensorLogged.class” for this experiment in the previous step and copy it to Realm Database.

    for (int i = 0; i < luxRealmData.size(); i++) {
       LuxData tempObject = luxRealmData.get(i);
       tempObject.setForeignKey(uniqueRef);
       realm.copyToRealm(tempObject);
       }
  4. Commit the transaction

    realm.commitTransaction();

Therefore now the data fetched for each sensor for every experiment is now being saved to the Realm database which we can easily query by using the following code. 

Below code will query all the SensorLogged object in the form of RealmResult<SensorLogged> list which we can use to show to the user the list of all experiments.

results = realm.where(SensorLogged.class)
       .findAll()
       .sort("dateTimeStart", Sort.DESCENDING);

And the code below will query all the LuxData object that contains reading belonging to one experiment whose uniqueRef has been provided as the ForeignKey.

RealmResults<LuxData> results = realm.where(LuxData.class).equalTo("foreignKey",uniqueRef).findAll();

Resources

  1. Realm Database official documentation for Java: https://realm.io/docs/java/latest
  2. AndroidHive blog on Android Working with Realm Database: https://www.androidhive.info/2016/05/android-working-with-realm-database-replacing-sqlite-core-data


Continue ReadingStoring Recorded Sensor Data in Realm Database

Voltage Measurement through Channels in PSLab

The Pocket Science Lab multimeter has got three channels namely CH1,CH2 and CH3 with different ranges for measuring the voltages.This blog will give a brief description on how we measure voltages in channels.

Measuring Voltages at channels can be divided into three parts:-

        1. Communication between between device and Android.
        2. Setting up analog channel (analog constants)
        3. Voltage measuring function of android.

Communication between PSLab device and Android App

The communication between the PSLab device and  Android occurs through the help of UsbManger package of CommunicationHandler class of the app. The main two functions involved in the communication are read and write functions in which we send particular number of bytes and then we receive certain bytes.

The read function :-

public int read(byte[] dest, int bytesToBeRead, int timeoutMillis) throws IOException {
    int numBytesRead = 0;
    //synchronized (mReadBufferLock) {
    int readNow;
    Log.v(TAG, "TO read : " + bytesToBeRead);
    int bytesToBeReadTemp = bytesToBeRead;
    while (numBytesRead < bytesToBeRead) {
        readNow = mConnection.bulkTransfer(mReadEndpoint, mReadBuffer, bytesToBeReadTemp, timeoutMillis);
        if (readNow < 0) {
            Log.e(TAG, "Read Error: " + bytesToBeReadTemp);
            return numBytesRead;
        } else {
            //Log.v(TAG, "Read something" + mReadBuffer);
            System.arraycopy(mReadBuffer, 0, dest, numBytesRead, readNow);
            numBytesRead += readNow;
            bytesToBeReadTemp -= readNow;
            //Log.v(TAG, "READ : " + numBytesRead);
            //Log.v(TAG, "REMAINING: " + bytesToBeRead);
        }
    }
    //}
    Log.v("Bytes Read", "" + numBytesRead);
    return numBytesRead;
}

Similarly the write function is –

public int write(byte[] src, int timeoutMillis) throws IOException {
    if (Build.VERSION.SDK_INT < 18) {
        return writeSupportAPI(src, timeoutMillis);
    }
    int written = 0;
    while (written < src.length) {
        int writeLength, amtWritten;
        //synchronized (mWriteBufferLock) {
        writeLength = Math.min(mWriteBuffer.length, src.length - written);
        // bulk transfer supports offset from API 18
        amtWritten = mConnection.bulkTransfer(mWriteEndpoint, src, written, writeLength, timeoutMillis);
        //}
        if (amtWritten < 0) {
            throw new IOException("Error writing " + writeLength +
                " bytes at offset " + written + " length=" + src.length);
        }
        written += amtWritten;
    }
    return written;
}

Although these are the core functions used for communication but the data received through these functions are further processed using another class known as PacketHandler. In the PacketHandler class also there are two major functions i.e sendByte and getByte(), these are the main functions which are further used in other classes for communication.

The sendByte function:-

public void sendByte(int val) throws IOException {
    if (!connected) {
        throw new IOException("Device not connected");
    }
    if (!loadBurst) {
        try {
            mCommunicationHandler.write(new byte[] {
                (byte)(val & 0xff), (byte)((val >> 8) & 0xff)
            }, timeout);
        } catch (IOException e) {
            Log.e("Error in sending int", e.toString());
            e.printStackTrace();
        }
    } else {
        burstBuffer.put(new byte[] {
            (byte)(val & 0xff), (byte)((val >> 8) & 0xff)
        });
    }
}

As we can see that in this function also the main function used is the write function of communicationHandler but in this class the data is further processed.

Setting Up the Analog Constants

For setting up the ranges, gains and other properties of channels, a different class of AnalogConstants is implemented in the android app, in this class all the properties which are used by the channels are defined which are further used in the sendByte() functions for communication.

public class AnalogConstants {

    public double[] gains = {1, 2, 4, 5, 8, 10, 16, 32, 1 / 11.};
    public String[] allAnalogChannels = {"CH1", "CH2", "CH3", "MIC", "CAP", "SEN", "AN8"};
    public String[] biPolars = {"CH1", "CH2", "CH3", "MIC"};
    public Map<String, double[]> inputRanges = new HashMap<>();
    public Map<String, Integer> picADCMultiplex = new HashMap<>();

    public AnalogConstants() {

        inputRanges.put("CH1", new double[]{16.5, -16.5});
        inputRanges.put("CH2", new double[]{16.5, -16.5});
        inputRanges.put("CH3", new double[]{-3.3, 3.3});
        inputRanges.put("MIC", new double[]{-3.3, 3.3});
        inputRanges.put("CAP", new double[]{0, 3.3});
        inputRanges.put("SEN", new double[]{0, 3.3});
        inputRanges.put("AN8", new double[]{0, 3.3});

        picADCMultiplex.put("CH1", 3);
        picADCMultiplex.put("CH2", 0);
        picADCMultiplex.put("CH3", 1);
        picADCMultiplex.put("MIC", 2);
        picADCMultiplex.put("AN4", 4);
        picADCMultiplex.put("SEN", 7);
        picADCMultiplex.put("CAP", 5);
        picADCMultiplex.put("AN8", 8);

    }
}

Also in the AnalogInput sources class many other properties such as CHOSA( a variable assigned to denote the analog to decimal conversion constant of each channel) are also defined

public AnalogInputSource(String channelName) {
    AnalogConstants analogConstants = new AnalogConstants();
    this.channelName = channelName;
    range = analogConstants.inputRanges.get(channelName);
    gainValues = analogConstants.gains;
    this.CHOSA = analogConstants.picADCMultiplex.get(channelName);
    calPoly10 = new PolynomialFunction(new double[] {
        0.,
        3.3 / 1023,
        0.
    });
    calPoly12 = new PolynomialFunction(new double[] {
        0.,
        3.3 / 4095,
        0.
    });
    if (range[1] - range[0] < 0) {
        inverted = true;
        inversion = -1;
    }
    if (channelName.equals("CH1")) {
        gainEnabled = true;
        gainPGA = 1;
        gain = 0;
    } else if (channelName.equals("CH2")) {
        gainEnabled = true;
        gainPGA = 2;
        gain = 0;
    }
    gain = 0;
    regenerateCalibration();
}

Also in this constructor a polynomial function is also called which further plays an important  role in measuring voltage as it is through this polynomial function we get the voltage of channels in the science lab class , also it is also used in oscilloscope for plotting the graph . So this was the setup of analog channels.

Voltage Measuring Functions

There are two major functions for measuring voltages which are present in the scienceLab class

  • getAverageVoltage
  • getRawableVoltage

Here are the functions

private double getRawAverageVoltage(String channelName) {
    try {
        int chosa = this.calcCHOSA(channelName);
        mPacketHandler.sendByte(mCommandsProto.ADC);
        mPacketHandler.sendByte(mCommandsProto.GET_VOLTAGE_SUMMED);
        mPacketHandler.sendByte(chosa);
        int vSum = mPacketHandler.getVoltageSummation();
        mPacketHandler.getAcknowledgement();
        return vSum / 16.0;
    } catch (IOException | NullPointerException e) {
        e.printStackTrace();
        Log.e(TAG, "Error in getRawAverageVoltage");
    }
    return 0;
}

This is the major function which takes the data from the communicationHandler class via packetHandler. Further this function is used in the getAverageVoltage function.

private double getAverageVoltage(String channelName, Integer sample) {
    if (sample == null) sample = 1;
    PolynomialFunction poly;
    double sum = 0;
    poly = analogInputSources.get(channelName).calPoly12;
    ArrayList < Double > vals = new ArrayList < > ();
    for (int i = 0; i < sample; i++) {
        vals.add(getRawAverageVoltage(channelName));
    }
    for (int j = 0; j < vals.size(); j++) {
        sum = sum + poly.value(vals.get(j));
    }
    return sum / vals.size();
}

This function uses the data from the getRawableVoltage function and uses it the polynomial generated in the analog lasses to calculate the final voltage. Thus this was the core backend of calculating the voltages through channels in PSLab.

Resources:

Continue ReadingVoltage Measurement through Channels in PSLab

Using Multimeter in PSLab Android Application

The Pocket Science Lab as we all know is on the verge of development and new features and UI are added almost every day. One such feature is the implementation of multimeter which I have also discussed in my previous blogs.

Figure (1) : Screenshot of the multimeter

But although many functionality of multimeter such as resistance measurement are working perfectly, there are still various bugs in the multimeter. This blog is dedicated to using multimeter in the android app.

Using the multimeter

Figure (2): Screenshot showing guide of multimeter

Figure (2) shows the guide of the multimeter, i.e how basic basic elements such as resistance and voltage are measured using the multimeter. The demonstration of measuring the resistance and voltage are given below.

Measuring the resistance

The resistance is measure by connecting the SEN pin to the positive end of resistor and the GND pin to the negative end of resistor and then clicking the RESISTANCE button.

                   Figure (3) : Demonstration of resistance measurement

Measuring the voltage

To measure the voltage as said in the Guide, directly connect the power source to the the channel pins, although currently only the CH3 pin will show the most accurate results, work is going on other channel improvisation as well.

Figure (4) : Demonstration of Voltage measurement


And thus this is how the multimeter is used is used in the android app.  Of course there are still many many features such as capacitance measurements which are yet to be implemented and the work is going on them

Resources:

Continue ReadingUsing Multimeter in PSLab Android Application

Deploying loklak search on Heroku & Using config to store and load external URLs

It is really important to have a separate configuration for all the hardcoded URLs having multiple instances across the project. It would help in testing and comparing projects like loklak with a separate configuration for hardcoded URLs. We would also be discussing deployment of Angular based loklak on heroku through this blog post.

Creating shared URL config

The idea here is to export a const Object containing all the collective hardcoded URLs used inside the project. We would try to store similar/collective URLs inside a same key e.g. all the github URLs must go inside key: ‘github’.

export const defaultUrlConfig = {
	fossasia: {
		root: 'https://fossasia.org',
		blog: 'https://blog.fossasia.org'
	},
	loklak: {
		apiServer: 'https://api.loklak.org',
		apiBase: 'loklak.org',
		blog: 'http://blog.loklak.net',
		dev: 'https://dev.loklak.org',
		apps: 'https://apps.loklak.org'
	},
	github: {
		loklak: 'https://github.com/loklak',
		fossasia: 'https://github.com/fossasia'
	},
	phimpme: {
		root: 'https://phimp.me'
	},
	susper: {
		root: 'https://susper.com'
	},
	susiChat: {
		root: 'https://chat.susi.ai'
	},
	pslab: {
		root: 'https://pslab.fossasia.org'
	},
	eventyay: {
		root: 'https://eventyay.com'
	}
};


Storing URLs with a key instead of storing it inside a simple Array, makes it easier to add a new URL at required place and easy to modify the existing ones. Now, this configuration can easily be called inside any Component file.

Using config inside the component

Now, the work is really simple. We just need to import the configuration file inside the required Component and store/use directly the respective URLs.

First step would be to import the configuration file as follows:

import { defaultUrlConfig } from ‘../shared/url-config’;


Note: Respective path for url-config file for different components might differ.

Now, we would need to store the defaultUrlConfig inside a variable.

public configUrl = defaultUrlConfig;


At this point, we have all the configuration URLs which could be extracted from configUrl.

Displaying URLs in HTML

We would use Angular’s interpolation binding syntax to display the URLs from configUrl in HTML. Let’s say we want to display FOSSASIA’s github url in HTML, then we would simply need to do:

{{ configUrl.github.fossasia }}


This could be used as an example to to replace all the hardcoded URLs inside the project.

Deploying loklak search on Heroku

Note: I am skipping the initial steps of creating a project on heroku. It is very easy to setup a project on heroku, for initial steps please follow up here.

First step in this direction would be to add a server.js file in root directory and add the following express server code in it:

const express = require(‘express’);
const path = require(‘path’);
const app = express();
app.use(express.static(__dirname + ‘/dist/<name-of-app>’));
app.get(‘/*’, function(req,res) {
res.sendFile(path.join(__dirname+‘/dist/<name-of-app>/index.html’));
});
app.listen(process.env.PORT || 8080);


Second step would be to add the following commands inside package.json at respective attributes.

“postinstall”: “ng build –aot -prod”
“start”: “node server.js”


Testing

Click on the respective URL link inside the project UI to test the configuration for hardcoded URLs. To check the deployment on heroku, please open the following URLs:

Development branch: loklak-search-dev.herokuapp.com

Master branch: loklak-search.herokuapp.com

Resources

Continue ReadingDeploying loklak search on Heroku & Using config to store and load external URLs

Implement Sensor Data Fetching Using AsyncTask

In PSLab android app we have implemented sensor data fetching of various sensors inbuilt in the mobile device like light sensor, accelerometer, gyrometer. We can use PSLab to log the data and show in the form of the graph or maybe export the data in the form of CSV format for future use.

But recording data from the phone sensor imposes a serious problem in the performance of the Android app as it is a costly to process in terms of memory, resources and time. In CS terms there is too much work that has to be done on the single main thread which sometimes leads to lag and compromises the UX.

So as a solution we applied a concept of the Multithreading provided by Java in which we can shift the heavy process to a separate background thread so that the main thread never gets interrupted during fetching the sensor data and the background thread handles all the fetching and updates the UI as soon as it gets the data, till then the Main thread continues to serves the user so to user the application remains always responsive.

For implementing this we used a special class provided by Android Framework called AsyncTask. Which provides below methods:-

  • doInBackground() : This method contains the code which needs to be executed in the background. In this method, we can send results multiple times to the UI thread by publishProgress() method.

  • onPreExecute() : This method contains the code which is executed before the background processing starts.

  • onPostExecute() : This method is called after doInBackground method completes processing. Result from doInBackground is passed to this method.

  • onProgressUpdate() : This method receives progress updates from doInBackground() method, which is published via publishProgress() method, and this method can use this progress update to update the UI thread.

  • onCancelled(): This method is called when the background task has been canceled. Here we can free up resources or write some cleanup code to avoid memory leaks.

We created a class SensorDataFetch and extended this AsyncTask class and override its methods according to our needs.

private class SensorDataFetch extends AsyncTask<Void, Void, Void> implements SensorEventListener {

   private float data;
   private long timeElapsed;

   @Override
   protected Void doInBackground(Void... params) {
      
       sensorManager.registerListener(this, sensor, updatePeriod);
       return null;
   }

   protected void onPostExecute(Void aVoid) {
       super.onPostExecute(aVoid);
       visualizeData();
   }

   @Override
   protected void onPreExecute() {
 super.onPreExecute();
   //do nothing
   }

   @Override
   protected void onProgressUpdate(Void... values) {
       super.onProgressUpdate(values);
          //do nothing
   }

   @Override
   protected void onCancelled() {
       super.onCancelled();
          //do nothing
   }

In doInBackground() method we implemented the fetching raw data from the sensor by registering the listener and in onPostExecute() method we updated that data on the UI to be viewed by the user.

When this process is being run in the background thread the Main UI thread is free and remains responsive to the user. We can see in Figure 1 below that the UI is responsive to the user swipe action even when the sensor data is updating continuously on the screen.

Figure 1 shows Lux Meter responding to user swipe while fetching sensor data flawlessly.


Resources

https://developer.android.com/reference/android/os/AsyncTask – Android Developer documentation for Async Task class.

Continue ReadingImplement Sensor Data Fetching Using AsyncTask

Snackbar Implementation in PSLab Android App

In PSLab android app we have developed the functionality of logging sensor data in CSV format. We can start and stop the data recording using the save button in the upper right corner of the menu bar and toast message was shown to notify the user for logging status whether it is started or stopped but it leads to some problem like:-

  • The user doesn’t know where the logged file has been created in the external storage.
  • If the user accidentally clicked on the save button the data logging will start the user have to manually go the storage location and delete the recently created unwanted CSV file.

What’s the solution?

The solution to both these problem is solved by implementing Snackbar instead of Toast message.

According to Material Design documentation:-

The Snackbar widget provides brief feedback about an operation through a message at the bottom of the screen. Snackbar disappears automatically, either after a timeout or after a user interaction elsewhere on the screen, and can also be swiped off the screen.

Snackbar can also offer the ability to perform an action, such as undoing an action that was just taken or retrying an action that had failed.


Figure 1 shows a Snackbar sample
(Source: – https://material.io/develop/android/components/snackbar/ )


To implement the Snackbar in our Android app I started by creating a custom snack bar class which contains all the code to create and show the Snackbar on the screen.

public class CustomSnackBar {

   public static void showSnackBar(@NonNull CoordinatorLayout holderLayout,  
                                   @NonNull String displayText,
                                   String actionText, 
                                   View.OnClickListener clickListener){
       
   Snackbar snackbar =     
              Snackbar.make(holderLayout,displayText,Snackbar.LENGTH_LONG)
              .setAction(actionText, clickListener);

  //do your customization here
}

The custom class contains a static method ‘showSnackBar()’ having parameters:

Parameter Return Type Description
holderLayout CoordinatorLayout Container layout in which the snack bar will be shown at the bottom (should not be null)
displayText String Text to be displayed in the content of Snackbar (should not be null)
actionText String Clickable text which has some action associated with it
clickListener View.OnClickListener On click listener specifying an action to be performed when actionText is clicked


Inside the method, I called the static make()  method provided by the Snackbar class and passed holderlayout, displayText and duration of Snackbar in this case Snackbar.LENGTH_LONG as parameters.

Then I called setAction() and passed in the actionText and the clickListener as parameters in it to set the action text. If we pass in null no action text will be generated.

Then, if we want to changes the action text color we can do that by calling setActionTextColor() and passing in the desired color.

snackbar.setActionTextColor(ContextCompat.getColor(holderLayout.getContext(), R.color.colorPrimary));

And if we want to change the content text color then we need to first get the view then we need to get the instance of TextView containing the content text using findViewById() and passing android.support.design.R.id.snackbar_text which is default ID for context TextView, and then call setTextColor() to set the desired color.

View sbView = snackbar.getView();
   TextView textView =     
             sbView.findViewById(android.support.design.R.id.snackbar_text);
       textView.setTextColor(Color.WHITE);
   }

So, now our Snackbar engine is complete now we need to call CustomSnackBar class static method showSnackbar() in our sensor data logger.

For doing this I replaced all the instances of the Toast message with the ‘CustomSnackBar’ by passing in the desired messages that were being passed in Toast message.

But I still need to find the location of our stored CSV file and a method to delete the current generated CSV file.

For that, I did below modification to the CSVLogger class in PSLab android app.

public class CSVLogger {
   private static final String CSV_DIRECTORY = "PSLab";
   public CSVLogger(String category) {
       this.category = category;
       setupPath();
   }
   /*Below methods are included at the bottom of the class */
   public String getCurrentFilePath() {
       return Environment.getExternalStorageDirectory().getAbsolutePath() +
               File.separator + CSV_DIRECTORY + File.separator + category;
   }
   public void deleteFile() {
       csvFile.delete();
   }
}

Now for passing the location of the stored file and implementing delete option, I called the below method when the CSV logging is stopped by the user:

CustomSnackBar.showSnackBar((CoordinatorLayout) parent.findViewById(R.id.cl),

                    “CSV File stored at” + " " +lux_logger.getCurrentFilePath(),
  
                    “DELETE”,

                    new View.OnClickListener() {
                              Override
                              public void onClick(View view) {
                                             lux_logger.deleteFile();    
                              });

By doing this I get a Snackbar as shown in Figure 2, clicking on the “DELETE” text deletes the current CSV file.

Figure 2 shows snackbar showing file stored location and delete option


So, implementing Snackbar helped to make the app interactive and keeps user notified and control the data logging.

Resources

  1. https://www.journaldev.com/10324/android-snackbar-example-tutorial – Android SnackBar example implemetation tutorial
  2. https://material.io/develop/android/components/snackbar/ – Android Material Desing implementation of Snackbar.

Continue ReadingSnackbar Implementation in PSLab Android App

Setting up environment to build PSLab Android app using Fdroid Build

Fdroid is a place for open source enthusiasts and developers to host their Free and Open Source Software (FOSS) for free and get more people onboard into their community. In order to host an app in their repository, one has to go through a several steps of builds and tests. This is to ensure that the software provided by them are as quality and safe as they can ever be. They are not allowing proprietary libraries or tools to integrate into any app or they will  be published outside the Fdroid main repository (fdroid-data) so that the users will know what they are downloading.

In a normal Linux computer where we are developing Android apps and have setup Android Studio will not be able to run the build command using:

$ fdroid build -v -l org.fossasia.pslab

The reason behind this is that we have not installed gradle and build tools required by the “fdroid build” because they are not useful in our day today activities for standalone activities. First thing we need to do is, install gradle separately. This will include adding gradle to $PATH as well.

Download the latest gradle version zip file or the version your project is using with the following command. In PSLab Android app, we are using 4.5.1 version and the snippet below include that version.

$ wget https://services.gradle.org/distributions/gradle-4.5.1-bin.zip

Next step is to install this in a local folder. We can select any path we want, but /opt/ folder is generally used in such scenarios.

sudo mkdir /opt/gradle
sudo unzip -d /opt/gradle gradle-4.5.1-bin.zip

Then we can add gradle to our $PATH variable using the following command:

$ export PATH=$PATH:/opt/gradle/gradle-4.5.1/bin

Now we are all set with gradle settings. Next step is to verify that the fdroid server is properly configured and up to date. When you run the build command after setting up the gradle in PC, it will throw an error similar to “failed to find any output apks”. This causes if the installed fdroid server version is old.

Fdroid server is running on python 3 and it will require some additional libraries pre-installed to properly function.

$ sudo apt-get install vagrant virtualbox git python3-certifi python3-libvirt python3-requestbuilder python3-yaml python3-clint python3-vagrant python3-paramiko python3-pyasn1 python3-pyasn1-modules

Once these libraries are installed, remove the previous instance of fdroidserver by using the following command:

$ sudo apt-get remove fdroidserver

Then we can reinstall the latest version of fdroid server from git using the following command:

$ git clone https://gitlab.com/fdroid/fdroidserver.git
export PATH="$PATH:$PWD/fdroidserver"

Now we are all set to do a brand new lint build on our PC to make our app ready to be published in Fdroid repository!

Reference:

  1. Install gradle : https://www.vultr.com/docs/how-to-install-gradle-on-ubuntu-16-10
  2. Gradle versions : https://gradle.org/releases
  3. Setting up Fdroid-server : https://f-droid.org/en/docs/Build_Server_Setup/

Installing fdroidserver : https://gitlab.com/fdroid/fdroiddata/blob/master/README.md#quickstart

Continue ReadingSetting up environment to build PSLab Android app using Fdroid Build

Using external UART modules to debug PSLab operations

Pocket Science Lab by FOSSASIA is a compact tool that can be used for circuit analytics and debugging. To make things more interesting, this device can be accessed via the user interface using an Android app or also a desktop app. Both these apps use the UART protocol (Universal Asynchronous Receiver-Transmitter) to transmit commands to the PSLab device from mobile phone or PC and receive commands vice versa. The peculiar thing about hardware is that the developer cannot simply log data just like developing and debugging a software program. He needs some kind of an external mechanism or a tool to visualize those data packets travelling through the wires.

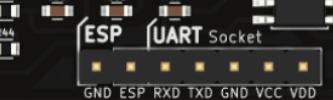
Figure 1: UART Interface in PSLab

PSLab has a UART interface extracted out simply for this reason and also to connect external sensors that use the UART protocol. With this, a developer who is debugging any of the Android app or the desktop app can view the command and data packets transmitted between the device and the user end application.

This  requires some additional components. UART interface has two communication related pins: Rx(Receiver) and Tx(Transmitter). We will need to monitor both these pin signals for input and output data packets. It should be kept in mind that PSLab is using 3.3V signals. This voltage level is important to mention here because if someone uses 5V signals on these pins, it will damage the main IC. There are FTDI modules available in market. FTDI stands for Future Technology Devices International which is a company name and their main product is this USB transceiver chip. These chips play a major role in electronic industry due to product reliability and multiple voltage support. PSLab uses 3.3V USB Tx Rx pins and modules other than FTDI wouldn’t support it.

Figure 2: FTDI Module from SparkFun

The module shown in Fig.2 is a FTDI module which you can simply plug in to computer and have a serial monitor interface. There are cheaper versions in shopping websites like eBay or Alibaba and they will also work fine. Both Tx and Rx pins will require two of these modules and connectivity is as follows;

PSLab [Rx Pin] → FTDI Module 1 [Rx Pin]
PSLab [Tx Pin] → FTDI Module 2 [Rx Pin]

This might look strange because everywhere we see a UART module is connected Rx → Tx and Tx → Rx. Notice that our idea is to monitor data packets. Not communicate with PSLab device directly. We want to see if our mobile phone Android app is sending correct commands to PSLab device or not and if PSLab device is transmitting back the expected result or not. This method helped a lot when debugging resistance measurement application in PSLab Android app.

Monitoring these UART data packets can be done simply using a serial monitor. You can either download and install some already built serial monitors or you can simply write a python script as follows which does the trick.

import serial

ser = serial.Serial(
    port='/dev/ttyUSB1',
    baudrate=1000000000
)

ser.isOpen()
while 1 :
    data = ''
    while ser.inWaiting() > 0:
        data += ser.read(1)

    if data != '':
        print ">>" + data

Once you are getting commands and responses, it will look like debugging a software using console.

References:

  1. PySerial Library : http://pyserial.readthedocs.io/en/latest/shortintro.html
  2. UART Protocol : https://en.wikipedia.org/wiki/Universal_asynchronous_receiver-transmitter
  3. FTDI : https://en.wikipedia.org/wiki/FTDI

Continue ReadingUsing external UART modules to debug PSLab operations

Implementing Multimeter in PSLab Android App

The Pocket Science Lab Android app being on the verge of development have various new features adding up per day. One of the new things added up recently is the splitting of the control section in three different instruments and implementing the control read section into a multimeter. This blog will be discussing about how the multimeter is implemented.

The different instruments are power section, multimeter and wave generator. While in the previous implementation of control section it was divided into three parts namely control main, control read and control advanced as shown in figure (1). The control is the power source, read is the multimeter and advanced section is the wave generator.

Figure  (1): Screenshot of control section

Figure (1) shows the previous implementation of a multimeter i.e the read section but as we know this is way different than the actual implementation of a multimeter and thus from here comes the task of implementing a new multimeter.

What is a Multimeter, how does it looks?

A multimeter basically is an instrument designed to measure electric current, voltage, and usually resistance, typically over several ranges of value.

          Figure (2): Showing a real multimeter instrument and its different sections [2]

Figure(2) clearly shows how an actual multimeter looks. It basically has three important components i.e the display the buttons and the rotary knob or the dial and thus the task was to implement the same in PSLab android.

Implementation in PSLab

Figure (3) :  Screenshot of new implementation of multimeter

The implementation of multimeter is thus inspired from its original look i.e it has got basic buttons, a rotary knob and a display. Figure (3) shows the implementation of multimeter in the android-app

Back-end of Multimeter

A separate multimeter activity was implemented for the multimeter. The main back-end part of getting the resistance, capacitance, frequency and count pulse were taken from the communication related classes such as the ScienceLab class and PacketHandler class. For example to get the voltage calculation we use the getRawableVoltage function

private double getRawAverageVoltage(String channelName) {
  try {
      int chosa = this.calcCHOSA(channelName);
      mPacketHandler.sendByte(mCommandsProto.ADC);
      mPacketHandler.sendByte(mCommandsProto.GET_VOLTAGE_SUMMED);
      mPacketHandler.sendByte(chosa);
      int vSum = mPacketHandler.getVoltageSummation();
      mPacketHandler.getAcknowledgement();
      return vSum / 16.0;
  } catch (IOException | NullPointerException e) {
      e.printStackTrace();
      Log.e(TAG, "Error in getRawAverageVoltage");
  }
  return 0;
}

The above function shows the pure backend of PSLab and how data is taken from the hardware using the packet handler class, after which the data is processed in various other functions after we getting the final result. Similarly the function to get count pulse is

public int readPulseCount() {
 try {
  mPacketHandler.sendByte(mCommandsProto.COMMON);
  mPacketHandler.sendByte(mCommandsProto.FETCH_COUNT);
  int count = mPacketHandler.getVoltageSummation();
  mPacketHandler.getAcknowledgement();
  return 10 * count;
 } catch (IOException e) {
  e.printStackTrace();
 }
 return -1;
}

As we see that the data is being taken through a similar manner in the above function i.e using the packetHandler class(by sending and receiving bytes). Thus in all the other functions for capacitance, frequency similar communication model can be found.

Similarly all the functions are implemented in the ScienceLab class and thus all the functions are directly called from the ScienceLab class in the Multimeter activity. For more knowledge on these one can directly have a look at the PSLab android app codes available in Github.

Implementation of the Rotary Knob

The rotary knob is implemented using the BeppiMenozzi Knob library. More information regarding the same can be found in my previous blog on implementing the rotary knob.

Resources:

Continue ReadingImplementing Multimeter in PSLab Android App